> ## Documentation Index
> Fetch the complete documentation index at: https://ampersand-24eb5c1a-quickstart-diataxis-tutorial.mintlify.site/llms.txt
> Use this file to discover all available pages before exploring further.
# Quickstart
export const Where = ({at}) =>
{at.split(",").map(k => {
const t = ({
dashboard: {
label: "Ampersand Dashboard",
bg: "#EEEAFA",
fg: "#5B47A0"
},
salesforce: {
label: "Salesforce",
bg: "#E7F1F8",
fg: "#3B6E8C"
},
cli: {
label: "Ampersand CLI",
bg: "#EDEDEF",
fg: "#4A4A52"
},
mailmonkey: {
label: "MailMonkey",
bg: "#F7ECE4",
fg: "#9A6238"
}
})[k.trim()];
if (!t) return null;
return
{t.label}
;
})}
;
In this Quickstart tutorial, you'll build a real integration for a fictional app called **MailMonkey**, an AI-powered email campaign manager, so it can sync data with its customers' Salesforce. By the end, you'll have a working integration that your customers can install from your own app's UI.
 ## What you'll build
You'll create a single Ampersand integration between MailMonkey and Salesforce that:
1. **Reads Contacts and Leads**: pulls all Contacts and Leads from a customer's Salesforce into MailMonkey.
2. **Creates Leads**: inserts a new Lead in Salesforce whenever someone replies to a MailMonkey email campaign.
You can see the final `amp.yaml` file that this tutorial builds toward on [GitHub](https://github.com/amp-labs/samples/blob/main/quickstart/amp.yaml).
## Prerequisites
Before you start, make sure you have:
* **An Ampersand account.** Sign up at [dashboard.withampersand.com](https://dashboard.withampersand.com/sign-up).
* **The Ampersand Command Line Interface (CLI) installed.** The `amp` CLI is the tool you'll use to deploy your integrations from the terminal. On macOS, install it with [Homebrew](https://brew.sh):
```bash bash theme={null}
brew tap amp-labs/cli
brew update
brew install amp-labs/cli/cli
```
On Windows or other systems, download the binary from the [releases page](https://github.com/amp-labs/cli/releases) and add it to your `PATH`. See the [CLI overview](/cli/overview) for details. Verify the install by running `amp`. You should see a list of available commands.
* **A Salesforce org** (a free [Developer Edition](https://developer.salesforce.com/signup) org works) that you can configure.
* **A React frontend** to embed the install UI into. If you don't have one, clone our [Starter Project](https://github.com/amp-labs/starter-project/tree/main).
## What you'll have at the end
A deployed integration and an embedded install wizard in your React app. When one of your customers clicks through it, they'll connect their Salesforce, choose which fields to sync, and their Contacts and Leads will start arriving at your webhook.
Each step below is tagged with where you'll be working:
## Step 1: Create an Ampersand org and project
Sign in to your [Ampersand account](https://dashboard.withampersand.com), then follow the on-screen steps to create an **org** and a **project**. Each org can have multiple projects, which is helpful for separating development and production environments.
Note your project's ID or name, since you'll need it when you deploy in Step 5.
> **Optional: claim your domain.** As an org owner, go to **org settings** and claim your domain so teammates auto-join when they sign up. Once enabled, anyone with a `@yourcompany.com` email is automatically added to your org.
**Checkpoint:** You're in the dashboard with a project selected.
## Step 2: Create a Salesforce provider app
A provider app holds the OAuth credentials Ampersand uses to connect to your customers' Salesforce. For Salesforce, this is an **External Client App** created in your own Salesforce org.
1. In Salesforce, go to **Setup**, search for **Dev Hub** in the Quick Find box, and select **Enable Dev Hub**.
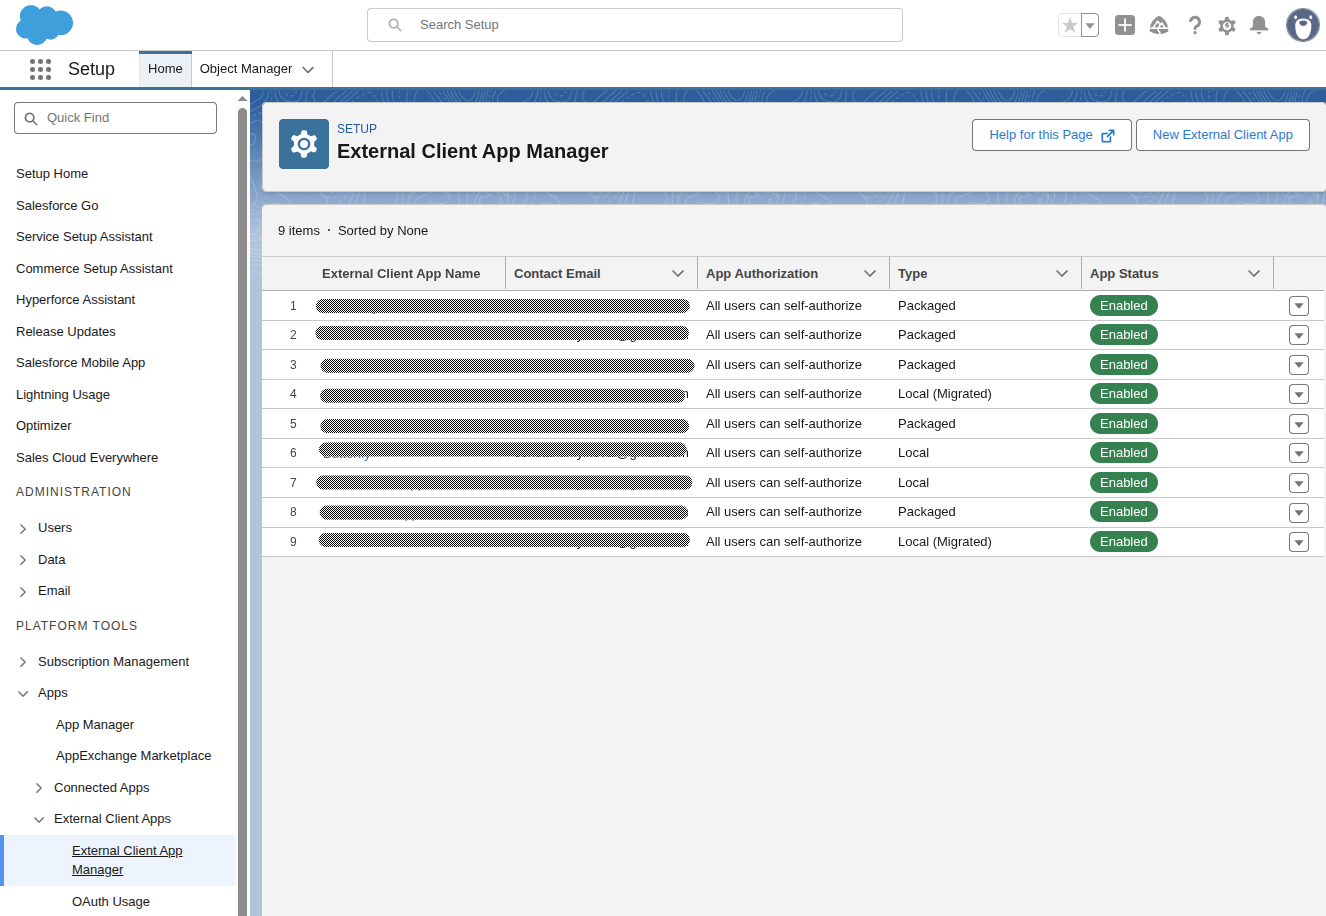
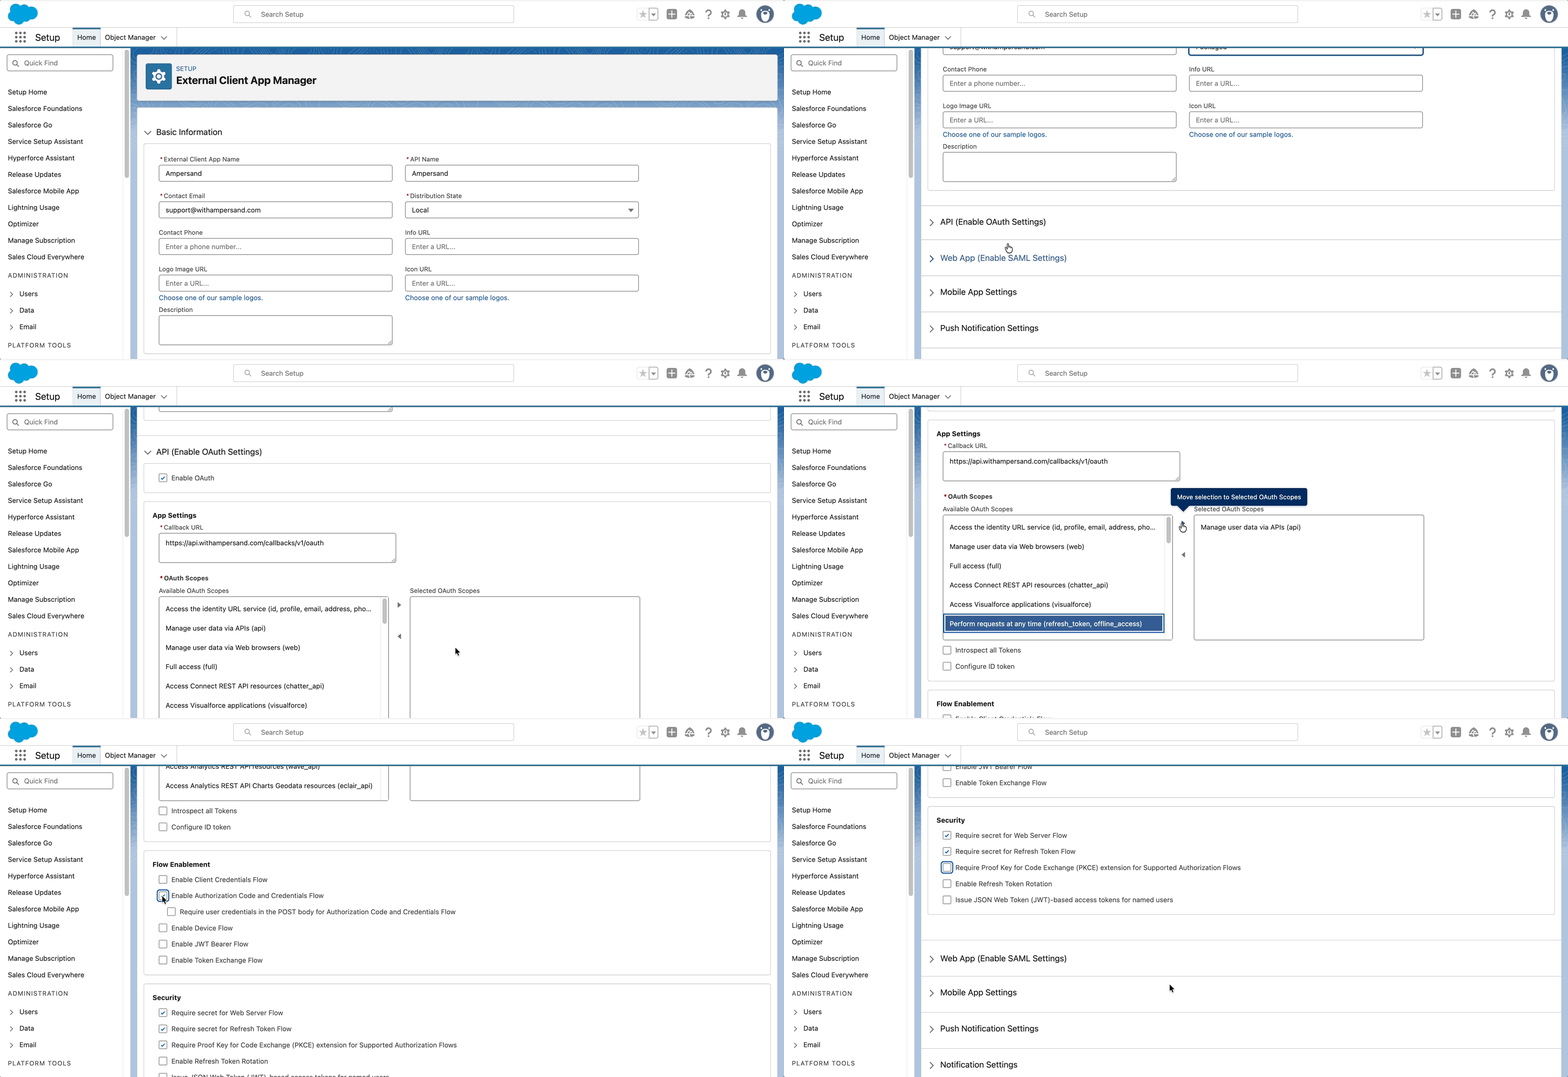
2. In **Setup**, search for **External Client App Manager** and click **New External Client App**. Give it a name, enable **OAuth settings**, and set the callback URL to:
```text text theme={null}
https://api.withampersand.com/callbacks/v1/oauth
```
## What you'll build
You'll create a single Ampersand integration between MailMonkey and Salesforce that:
1. **Reads Contacts and Leads**: pulls all Contacts and Leads from a customer's Salesforce into MailMonkey.
2. **Creates Leads**: inserts a new Lead in Salesforce whenever someone replies to a MailMonkey email campaign.
You can see the final `amp.yaml` file that this tutorial builds toward on [GitHub](https://github.com/amp-labs/samples/blob/main/quickstart/amp.yaml).
## Prerequisites
Before you start, make sure you have:
* **An Ampersand account.** Sign up at [dashboard.withampersand.com](https://dashboard.withampersand.com/sign-up).
* **The Ampersand Command Line Interface (CLI) installed.** The `amp` CLI is the tool you'll use to deploy your integrations from the terminal. On macOS, install it with [Homebrew](https://brew.sh):
```bash bash theme={null}
brew tap amp-labs/cli
brew update
brew install amp-labs/cli/cli
```
On Windows or other systems, download the binary from the [releases page](https://github.com/amp-labs/cli/releases) and add it to your `PATH`. See the [CLI overview](/cli/overview) for details. Verify the install by running `amp`. You should see a list of available commands.
* **A Salesforce org** (a free [Developer Edition](https://developer.salesforce.com/signup) org works) that you can configure.
* **A React frontend** to embed the install UI into. If you don't have one, clone our [Starter Project](https://github.com/amp-labs/starter-project/tree/main).
## What you'll have at the end
A deployed integration and an embedded install wizard in your React app. When one of your customers clicks through it, they'll connect their Salesforce, choose which fields to sync, and their Contacts and Leads will start arriving at your webhook.
Each step below is tagged with where you'll be working:
## Step 1: Create an Ampersand org and project
Sign in to your [Ampersand account](https://dashboard.withampersand.com), then follow the on-screen steps to create an **org** and a **project**. Each org can have multiple projects, which is helpful for separating development and production environments.
Note your project's ID or name, since you'll need it when you deploy in Step 5.
> **Optional: claim your domain.** As an org owner, go to **org settings** and claim your domain so teammates auto-join when they sign up. Once enabled, anyone with a `@yourcompany.com` email is automatically added to your org.
**Checkpoint:** You're in the dashboard with a project selected.
## Step 2: Create a Salesforce provider app
A provider app holds the OAuth credentials Ampersand uses to connect to your customers' Salesforce. For Salesforce, this is an **External Client App** created in your own Salesforce org.
1. In Salesforce, go to **Setup**, search for **Dev Hub** in the Quick Find box, and select **Enable Dev Hub**.
2. In **Setup**, search for **External Client App Manager** and click **New External Client App**. Give it a name, enable **OAuth settings**, and set the callback URL to:
```text text theme={null}
https://api.withampersand.com/callbacks/v1/oauth
```
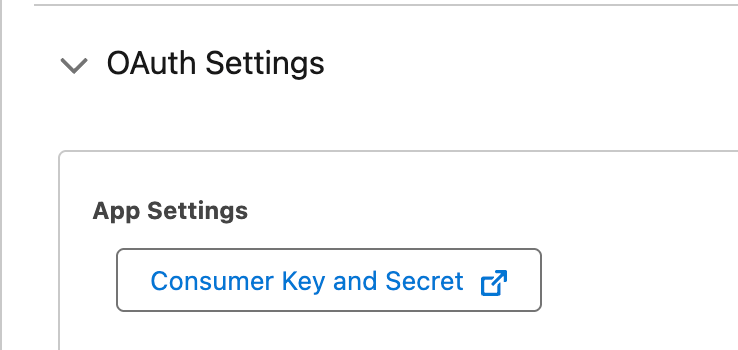
 3. Open the app's **Settings → OAuth Settings → Consumer Key and Secret** and copy the **Consumer Key** and **Consumer Secret**.
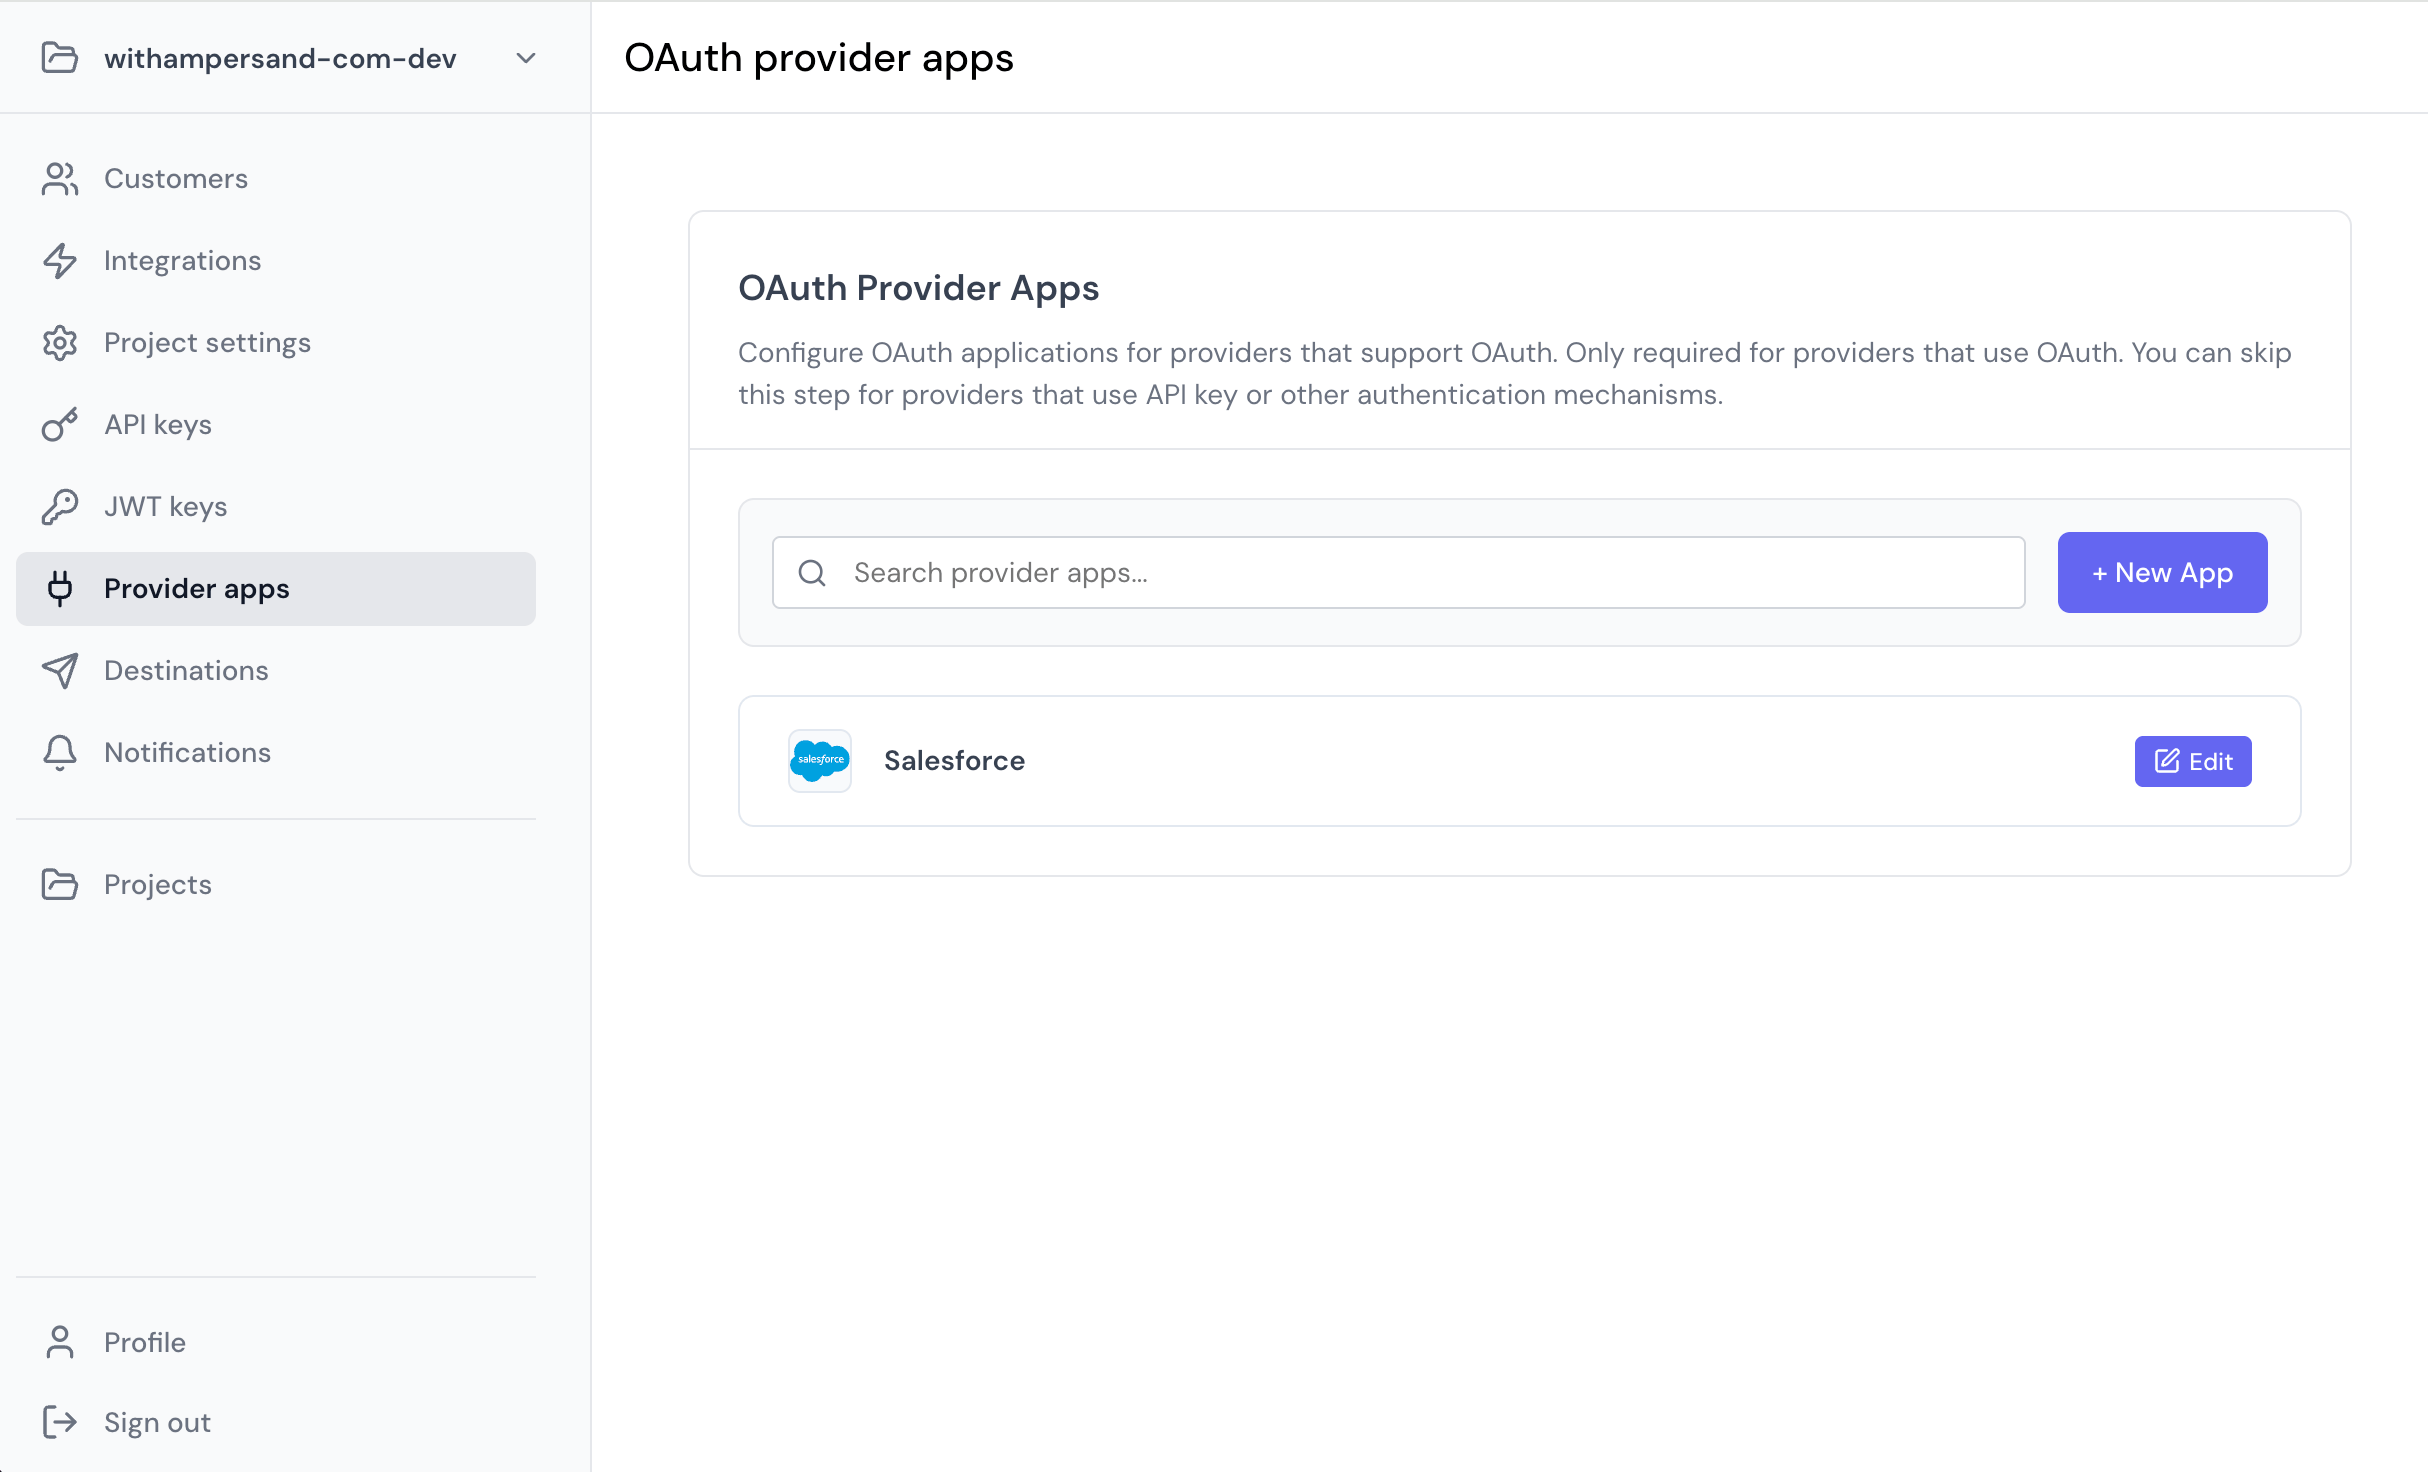
 4. In the Ampersand [Dashboard](https://dashboard.withampersand.com), select your project, go to **Provider apps**, and choose **Salesforce**. Paste the **Consumer Key** as the **Client ID** and the **Consumer Secret** as the **Client Secret**, then save.
 > **Going to production?** Salesforce also requires you to register a namespace and package the External Client App so customers can install it. Those steps are covered in the full [Salesforce provider guide](/provider-guides/salesforce).
**Checkpoint:** Salesforce now appears under **Provider apps** in your project.
## Step 3: Create a destination
A destination is where Ampersand delivers the data it reads from Salesforce. For this tutorial we'll use webhooks.
1. Go to the [Destinations page](https://dashboard.withampersand.com/projects/_/destinations) in the dashboard and add a new destination.
2. Provide a **name** (this is the alias you'll reference in `amp.yaml`) and a **URL** that starts with `https`.
Create **two** destinations so they match the manifest in the next step:
* `contactWebhook`
* `leadsWebhook`
> Don't have a real endpoint yet? Create a temporary one with the [Hookdeck Console](https://console.hookdeck.com?provider=ampersand) and paste its URL. For the payload format and signature verification, see [Webhooks](/destinations/webhooks) and the [Destinations overview](/destinations/overview).
**Checkpoint:** Both `contactWebhook` and `leadsWebhook` are listed on the Destinations page.
## Step 4: Define the integration
Create a folder called `source` with a file inside called `amp.yaml`. This is where you define the integration.
The manifest below is the minimum needed to learn the flow: a [Read action](/read-actions) for two objects (`contact` and `lead`) and a [Write action](/write-actions) for `lead`.
```YAML source/amp.yaml theme={null}
specVersion: 1.0.0
integrations:
- name: mailmonkey-salesforce
displayName: MailMonkey Salesforce Integration
provider: salesforce
read:
objects:
# Read contacts into MailMonkey.
- objectName: contact
destination: contactWebhook
schedule: "*/30 * * * *" # every 30 minutes
backfill:
defaultPeriod:
fullHistory: true
requiredFields:
- fieldName: firstname
- fieldName: lastname
- fieldName: email
# Read leads, and let the customer map their own priority field.
- objectName: lead
destination: leadsWebhook
schedule: "*/30 * * * *"
backfill:
defaultPeriod:
fullHistory: true
requiredFields:
- fieldName: firstname
- fieldName: lastname
- fieldName: email
- mapToName: priority
mapToDisplayName: Priority Score
prompt: Which field do you use to track the priority of a lead?
write:
objects:
# Create a new lead in Salesforce whenever MailMonkey makes an API request.
- objectName: lead
```
Once a customer installs the integration, MailMonkey's backend calls Ampersand to create a new Lead whenever it detects an email reply.
> This is a trimmed manifest to keep the tutorial focused. For the complete set of options (optional fields, field mappings, custom schedules, and more), see the [Manifest schema reference](/manifest-reference) and the [full sample on GitHub](https://github.com/amp-labs/samples/blob/main/quickstart/amp.yaml).
**Checkpoint:** You have a `source/amp.yaml` file with a `read` and a `write` block.
## Step 5: Deploy the manifest
Deploy the integration with the [`amp` CLI](/cli/overview):
```bash bash theme={null}
amp login
# Our amp.yaml file is in a folder called source.
amp deploy source --project=my-project-id-or-name
```
**Checkpoint:** In the dashboard, open your project's **Integrations**. You should see **MailMonkey Salesforce Integration** listed.
## Step 6: Embed the UI component
Now embed Ampersand's React library so your customers can install the integration themselves. The `InstallIntegration` component handles the auth flow and configuration steps for you. See [Prebuilt UI components](/embeddable-ui-components) for the full component set.
First, create an API key in the dashboard under **API keys**:
> **Going to production?** Salesforce also requires you to register a namespace and package the External Client App so customers can install it. Those steps are covered in the full [Salesforce provider guide](/provider-guides/salesforce).
**Checkpoint:** Salesforce now appears under **Provider apps** in your project.
## Step 3: Create a destination
A destination is where Ampersand delivers the data it reads from Salesforce. For this tutorial we'll use webhooks.
1. Go to the [Destinations page](https://dashboard.withampersand.com/projects/_/destinations) in the dashboard and add a new destination.
2. Provide a **name** (this is the alias you'll reference in `amp.yaml`) and a **URL** that starts with `https`.
Create **two** destinations so they match the manifest in the next step:
* `contactWebhook`
* `leadsWebhook`
> Don't have a real endpoint yet? Create a temporary one with the [Hookdeck Console](https://console.hookdeck.com?provider=ampersand) and paste its URL. For the payload format and signature verification, see [Webhooks](/destinations/webhooks) and the [Destinations overview](/destinations/overview).
**Checkpoint:** Both `contactWebhook` and `leadsWebhook` are listed on the Destinations page.
## Step 4: Define the integration
Create a folder called `source` with a file inside called `amp.yaml`. This is where you define the integration.
The manifest below is the minimum needed to learn the flow: a [Read action](/read-actions) for two objects (`contact` and `lead`) and a [Write action](/write-actions) for `lead`.
```YAML source/amp.yaml theme={null}
specVersion: 1.0.0
integrations:
- name: mailmonkey-salesforce
displayName: MailMonkey Salesforce Integration
provider: salesforce
read:
objects:
# Read contacts into MailMonkey.
- objectName: contact
destination: contactWebhook
schedule: "*/30 * * * *" # every 30 minutes
backfill:
defaultPeriod:
fullHistory: true
requiredFields:
- fieldName: firstname
- fieldName: lastname
- fieldName: email
# Read leads, and let the customer map their own priority field.
- objectName: lead
destination: leadsWebhook
schedule: "*/30 * * * *"
backfill:
defaultPeriod:
fullHistory: true
requiredFields:
- fieldName: firstname
- fieldName: lastname
- fieldName: email
- mapToName: priority
mapToDisplayName: Priority Score
prompt: Which field do you use to track the priority of a lead?
write:
objects:
# Create a new lead in Salesforce whenever MailMonkey makes an API request.
- objectName: lead
```
Once a customer installs the integration, MailMonkey's backend calls Ampersand to create a new Lead whenever it detects an email reply.
> This is a trimmed manifest to keep the tutorial focused. For the complete set of options (optional fields, field mappings, custom schedules, and more), see the [Manifest schema reference](/manifest-reference) and the [full sample on GitHub](https://github.com/amp-labs/samples/blob/main/quickstart/amp.yaml).
**Checkpoint:** You have a `source/amp.yaml` file with a `read` and a `write` block.
## Step 5: Deploy the manifest
Deploy the integration with the [`amp` CLI](/cli/overview):
```bash bash theme={null}
amp login
# Our amp.yaml file is in a folder called source.
amp deploy source --project=my-project-id-or-name
```
**Checkpoint:** In the dashboard, open your project's **Integrations**. You should see **MailMonkey Salesforce Integration** listed.
## Step 6: Embed the UI component
Now embed Ampersand's React library so your customers can install the integration themselves. The `InstallIntegration` component handles the auth flow and configuration steps for you. See [Prebuilt UI components](/embeddable-ui-components) for the full component set.
First, create an API key in the dashboard under **API keys**:
 Then add the component to your app. Note that the `integration` prop must match the `name` from your `amp.yaml` (`mailmonkey-salesforce`):
```TypeScript TypeScript theme={null}
import { AmpersandProvider, InstallIntegration } from '@amp-labs/react';
const options = {
project: 'my-project', // Your Ampersand project name or ID.
apiKey: 'API_KEY', // The API key you created in the Dashboard.
};
function App() {
return (
)
}
```
When you render this component, your customer sees the install wizard:
Then add the component to your app. Note that the `integration` prop must match the `name` from your `amp.yaml` (`mailmonkey-salesforce`):
```TypeScript TypeScript theme={null}
import { AmpersandProvider, InstallIntegration } from '@amp-labs/react';
const options = {
project: 'my-project', // Your Ampersand project name or ID.
apiKey: 'API_KEY', // The API key you created in the Dashboard.
};
function App() {
return (
)
}
```
When you render this component, your customer sees the install wizard:
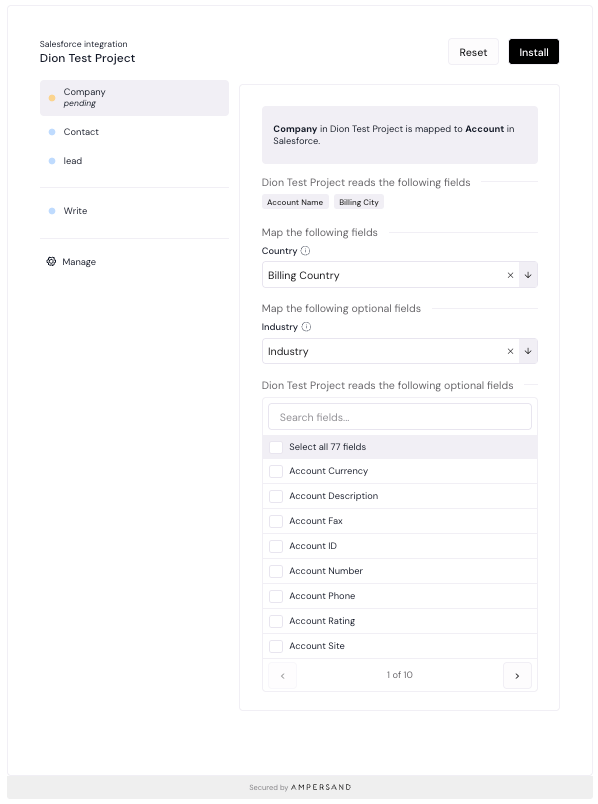 **Checkpoint:** The install wizard renders in your app. After a customer connects their Salesforce and picks their fields, Contacts and Leads start arriving at your `contactWebhook` and `leadsWebhook` destinations, and your integration is live. 🎉
## What's next
* [Prebuilt UI components](/embeddable-ui-components): customize the install experience and manage installed integrations.
* [Manifest schema reference](/manifest-reference): the complete set of `amp.yaml` options.
* [Destinations overview](/destinations/overview): deliver data to webhooks, S3, or Kinesis.
* [Salesforce provider guide](/provider-guides/salesforce): package your app for production.
**Checkpoint:** The install wizard renders in your app. After a customer connects their Salesforce and picks their fields, Contacts and Leads start arriving at your `contactWebhook` and `leadsWebhook` destinations, and your integration is live. 🎉
## What's next
* [Prebuilt UI components](/embeddable-ui-components): customize the install experience and manage installed integrations.
* [Manifest schema reference](/manifest-reference): the complete set of `amp.yaml` options.
* [Destinations overview](/destinations/overview): deliver data to webhooks, S3, or Kinesis.
* [Salesforce provider guide](/provider-guides/salesforce): package your app for production.